Thursday, 14 January 2016
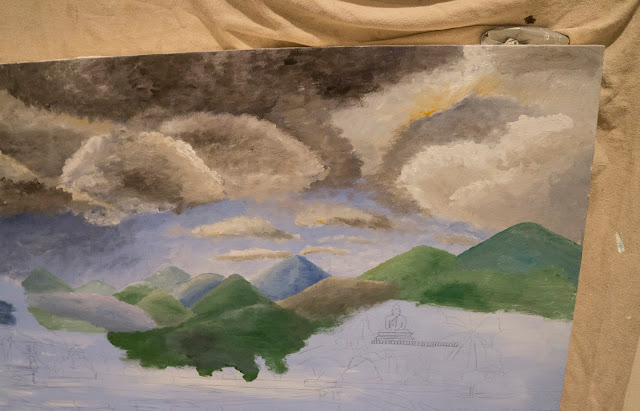
Oil and Acrylic on Canvas.
I am so proud of the clouds on the far left, I think I went to dark with the other ones, but with it being such a big canvas (175cm wide) the paint dried really fast. Which meant there was lots of layers of paint, so It was a bit textured, but with the quality of cameras these days it hasn't mattered too much in the picture. I only did the mountains and clouds because it was making me really sad not being able to paint in a non realistic style, I definitely was meant to be more creative, I also plan on finishing the painting in a non realistic manner, I knew it just wouldn't sit well with the imagery so I basically told myself not to get upset over it and just get it over with. That's pretty much how this project ended, do I regret not doing more? Well looking back I actually think I've done a decent amount of practical work, but saying that I know myself and I know I haven't reached my potential, but it just means I have to push the boat out in extended practice. I am very greatful for finding out about all the magicians behind live action films and I have so much respect for them and therefore I appreciate the research I have carried out. I also think next project I need to be less indecisive, make decisions a lot faster so I'll definitely have to plan lock down dates. Otherwise that will be my downfall. Anyways I hope you've enjoyed the exploration of matte painting and my soul, bye x
Saturday, 9 January 2016
OIL ON GLASS
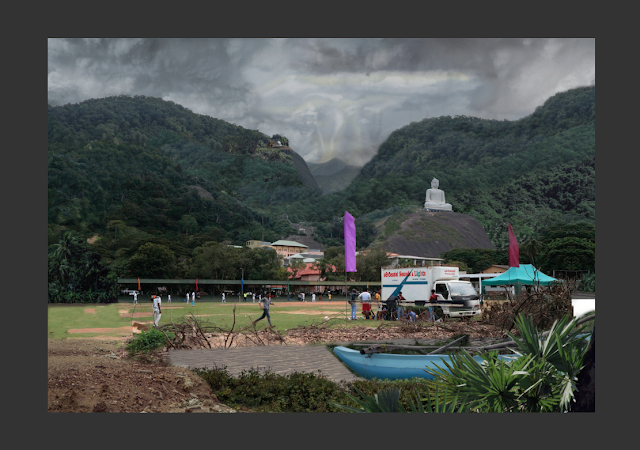
I think it's safe to say for this test i shouldn't be a compositor.
Also that I need a better printer to colour match.
Positives of this though, the painting itself showed me that it actually requires little detail to portray depth on screen. And also that texturing does a world of wonders in digital matte painting. Aside the face that this looks like a three year old made a scrap book, I think I portrayed the idea well enough, I don't think I'm going to begin the lifelong journey of being a matte painter, please let me go back and do fake stuff. No realism.
Friday, 8 January 2016
Digital Matte Painting 4
BEFORE Yes I know the exposure is appalling but look how magical that roundabout looks. So this was taken from a rooftop bar in Colombo.
AFTER
Replacement sky, some colouring on the buildings, played with the gamma, trimmed the bottom bit out with cloning, fiddling in lots of small places for a few hours to get this. Those cranes were a bloody nightmare to do. This is the only one I don't have footage for, but imagine a city pan, that's the kind of thing they'd use it for in industry.
Digital Matte Painting 3
BEFORE
AFTER
Ooh this is fun it's like playing spot the difference. So this scene I photographed with and without the pole, because a lot of matte painting are about clean up, it was quite therapeutic to do actually. I also changed the contrast of some of the paddy fields to make them pop and gave it a new sky and got rid of the cables.
Digital Matte Painting 2
BEFORE - very under exposed, it was sunny okay I couldn't see the screen. I made it look stormy though.
AFTER
I think I over worked this matte painting, I just wanted it to be really special though. And it does just look a bit cheap, but I got to apply all the peru tutorial techniques so that was exciting. I think it's clear to see the thought process from these screen shots. Again I did take a video of them playing football. Not very well shot though so I didn't bother compositing any of them, I definitely do not want to learn that anytime soon, that can wait until I can function the software I already know.
I think if I was to do it again I wouldn't make the mountain on the left so humpy.
The sky was a bitch to do there's fourteen layers there, I think I was really precious about it because of how successfully I'd done the one in the tutorial.
This just mirrored well.
This tree set was from another photo.
Although because all the photo's were taken in different lighting to get the colour balance to match up I had to play around with it and google how to do it and I still struggled.
At one point I just thought fuck it and created a new layer and put like a colour on it and changed the opacity.
I was going to try this water but then I realised it had the TukTuk reflections. But I did use the grass.
The sand bit is off one of my beach photos.
Digital Matte Painting 1
BEFORE
AFTER
There is also video footage of this area from the original plate. If i was to do a shot with this scene, I'd have characters horse riding through the rice field onto a quest that takes them over the hills in the background.
PROCESS
Now admittedly there definitely was as many steps as the tutorial, but I thought I should break in easy, and I did try several trees in the foreground but I just didn't have a good enough picture of one from my travels, that's something I definitely realised is that I didn't take enough pictures. I didn't know though.
I just didn't think the trees made it as strong so I didn't clean them up properly, but with it being a matte painting, that'd be where the action is on that side of the screen so I think it's a good thing.
Thursday, 7 January 2016
Digital Matte Painting Tutorial.
http://www.digitalartsonline.co.uk/tutorials/photoshop/epic-fantasy-digital-matte-painting/#16
Before commencing my own digital matte painting's I thought it best to do a tutorial as it's a completely different set of skills i'm used to using. The tutorial was supposed to take me 30hours but I spent around 50 on it and didn't end up finishing it to the same standard as what the tutorial does, as I didn't want to reproduce the exact same thing they had, but rather utilise the skills it taught me to my own work, so once I'd noted all the skills I applied them to my own work.
1. Block out the areas, just like painting!

You can see the final image looks a lot different because the tutorial shows you how to change contrast and colour levels of other photo's to use as reference to apply over the top of your basic drawing to texture it and make it look more realistic. I was devastated that I covered up the mountains I'd drawn, moron I should of read ahead first instead of being too keen to do it. I didn't do the final few steps because at this point I read ahead and it was more cloning and tools it had already taught me. Although it did teach me how to add noise to an image to a reference photo to make it look more like the plate so that was super useful to take note for my own digital work. Other things noteable I took from this was canvas size, erm composition, it was so so helpful, this basically gave me the confidence to go into my own work, as a complete novice at this.
Before commencing my own digital matte painting's I thought it best to do a tutorial as it's a completely different set of skills i'm used to using. The tutorial was supposed to take me 30hours but I spent around 50 on it and didn't end up finishing it to the same standard as what the tutorial does, as I didn't want to reproduce the exact same thing they had, but rather utilise the skills it taught me to my own work, so once I'd noted all the skills I applied them to my own work.
1. Block out the areas, just like painting!
So I used the clone tool on the back mountain which was a ball ache. Then I spent ages doing the mid ground one, and I just couldn't get happy with it.
Then the foreground mountain, oh my god I had so much fun playing with brushes and textures, I know it doesn't look realistic but I am so excited to apply the knowledge I learnt to concept art. I managed to make a brush that looks just like the texture that Elle Michalka uses, (the woman that does the art direction for Steven Universe), so exciting. I'm going to have the best concept art ever no textures no realism it'll be fantastic.
http://us1.campaign-archive1.com/?u=12fb19fdc11752885cb585f83&id=495800b8ff
Right so the sky, I am so bloody proud of this sky, honestly it took me hours. So it's five different cloud pictures with like different opacity levels. And some of them are upside down, and then I added in extra foggyness with a cloudy brush and later on yellowy/orange bits so it looks like the sun is behind. My first attempt I've accidently deleted the screenshots, but I'm glad because it was horrendous.

The other front cliff was easier because there was less tonal difference, looking back I think the fron bit on the right would be better if instead of pulling greens from the grass I'd of pulled them from the mountains.
You can see the final image looks a lot different because the tutorial shows you how to change contrast and colour levels of other photo's to use as reference to apply over the top of your basic drawing to texture it and make it look more realistic. I was devastated that I covered up the mountains I'd drawn, moron I should of read ahead first instead of being too keen to do it. I didn't do the final few steps because at this point I read ahead and it was more cloning and tools it had already taught me. Although it did teach me how to add noise to an image to a reference photo to make it look more like the plate so that was super useful to take note for my own digital work. Other things noteable I took from this was canvas size, erm composition, it was so so helpful, this basically gave me the confidence to go into my own work, as a complete novice at this.
Subscribe to:
Comments (Atom)


